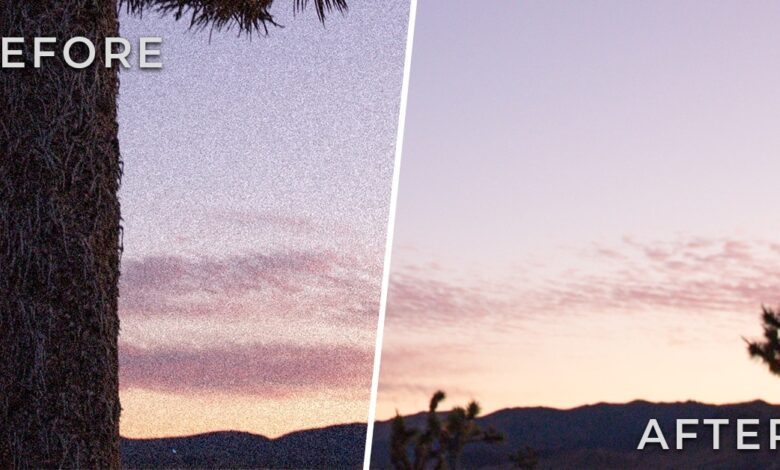
Snap a fantastic picture, only to realise later that it looks more like a blurry mess than a masterpiece? We’ve all been there. Those grainy photos can really spoil your best moments. But fear not! Below, you’ll find out what causes this problem, how to clean up grainy photos easily in post-production, and how to avoid it in the future.
What Leads to Grainy Photos?
Let’s get to know the troublemakers behind this common photography woe.
Low Light Conditions
The most frequent cause of graininess is poor lighting. When the environment is dim, cameras often increase the ISO setting. While a higher ISO makes the sensor more sensitive, it also introduces unwanted noise.
Incorrect Camera Settings
Using the wrong settings for shutter speed or aperture can lead to grainy results. A slow shutter speed can make even minor camera movements appear as blurriness and noise.
Outdated Equipment
Older cameras or budget smartphones might struggle in low-light scenarios, resulting in grainier images.
Over-Editing
Sometimes, applying heavy filters or excessive editing can worsen graininess rather than improve it.
Now that we know what causes grainy photos, let’s explore how to effectively reduce or eliminate this issue using editing software.
How to Remove Graininess
For this task, we’ll be using PhotoWorks, a user-friendly photo editing software that offers powerful features to help you improve your images. Here’s a step-by-step guide to fix grainy photos with this program.
Step 1: Download and Install PhotoWorks
If you don’t already have PhotoWorks, head over to the official website and download it. The installation process is straightforward and quick. Just follow the on-screen instructions and you’ll start editing in no time!
Step 2: Open Your Photo
Once PhotoWorks is installed, launch the program. Click on “Open Photo” to select the grainy photo you want to fix.
Step 3: Use the Noise Reduction Tool
Here comes the exciting part! PhotoWorks has the Noise Reduction tool that helps minimise graininess, just switch to the Tools tab to find it. Move the Amount slider slowly to the right. You’ll notice that the graininess starts to reduce. Be careful not to overdo it, though! If you go too far, your image can become soft and lose detail.
Step 4: Fine-Tune Your Image
After reducing the noise, take a look at the overall quality of your photo. Sometimes, noise reduction can make images look a bit flat. Here are some adjustments you might want to make. Add a touch of sharpness if your image appears overly soft. Simply go back to the Enhancement tab and find the Sharpness tool. Whether the photo looks dull after noise reduction, tweak the contrast and brightness. Use the sidebar sliders in the Enhancement tab.
Step 5: Save Your Masterpiece
Once you’re happy with your edits, it’s time to save your work. Click on “Save” and choose your desired file format. Make sure to save a copy in high resolution, so you have a clear, professional-looking photo.
Tips to Prevent Grainy Photos
While knowing how to fix grainy photos is invaluable, prevention is even better! Here are some pro tips to help you sidestep grainy images right from the start:
Use Proper Lighting
Lighting is everything in photography. Strive to snap photos in well-lit environments. Natural light is your best friend! When indoors, consider using additional light sources or even bouncing flash off walls to spread that light around.
Adjust Your Camera Settings
If you’re using a DSLR or a camera with manual controls, monitor your ISO levels. Lower settings (like 100-400) are far friendlier for reducing noise. Play with your shutter speed and aperture to let in more light without cranking up the ISO, and you’ll be golden!
Stabilise Your Camera
Use a tripod or find a stable surface when shooting in low light. This will reduce the chance of camera shake, especially if you’re using slower shutter speeds. Think of it as trying to draw straight lines while standing on a bus – with stabilisation, your lines will be nice and clear!
Choose the Right Equipment
If photography is your passion, consider investing in a decent camera. Higher-quality sensors perform way better in low-light conditions, giving you a leg up on avoiding grainy images.
Practice Makes Perfect
Wondering what the best way is to improve your photography game? Practice! The more you shoot, the better you’ll understand your camera settings and how to adjust them for various lighting conditions. If you keep at it, you’ll feel like a pro in no time!
Final Thoughts
Grainy photos can be frustrating, but with post-processing tools, fixing them is easier than you might think. So, next time you find yourself facing a grainy photo, don’t panic. Pull out this guide, tackle those edits, and create stunning, clear images. Remember, practice is key – the more you shoot,the sharper your skills will become!